
I’m glad to be writing for this website again. I really enjoyed writing this last review and I’ve hopefully gotten over my general malaise and writer’s block. There are many reasons I took more than a year off, and I might elaborate on them at some point. But for now, I’m back and doing my best.
This isn’t my usual Dragon Fortress Fare, but it is tangentially related to my childhood interests, so we’ll say that it fits the bill well enough and go with it. And, if it’s not for you and doesn’t suit your interests, you can always come back for the next one.
I own many, many Gundam action figures. I prefer action figures to model kits. But when you start watching Gundam Build Fighters and Build Divers, something starts to happen inside your brain. Damn you, 30 minute toy commercials disguised as cartoons…
I recently built the first Gundam model kit I’ve attempted in over two decades. It was not an easy process and the results weren’t spectacular, but perfection wasn’t the desired outcome. I’m not some woo-woo TikTok influencer, but the journey was still the entire point of this endeavor.
Building this kit was an exercise in patience, overcoming challenges, and giving myself grace. And, on that level, it met my expectations.

As many of you know, I am disabled. I try not to harp on it too much, especially because it’s not the most visible disability, but it does affect my life and who I am as a person. In short, I have very, very shaky hands, poor motor skills, and bad hand/eye coordination. It gets worse with each passing year. There are many days where I can barely raise a glass of water to my mouth, let alone pose and photograph an army doll.
I’m not saying this to throw myself a pity party or drum up sympathy, I’m just stating it because it was the motivation for this entire project. In general day-to-day life I’m just fine and many people may not even notice that I have a disability. But it’s still something that I deal with and it has an impact on everything I do, including my toy-related interests.
So I thought returning to a hobby I enjoyed as a teenager, one that requires some amount of steadiness and precision, might be a good thing for me. This little blog post documents my journey.
My History with Gunpla
I’m by no means an expert, so I won’t try to overexplain the concept of Gunpla to you in this space, but the term just refers to a plastic Gundam model kit– one you cut out and build yourself. For the purposes of this post, I’ll be using the terms ‘Gunpla’ and ‘Gundam model’ interchangeably.
I purchased and built my first Gundam model kit when I was 16 years old. My friend, his dad, another friend, and myself all went to Salt Lake City for a Utah Jazz game. Before the game, we went to the mall. In the mall, there was an anime store, which one friend and I were very excited to check out. We were lifelong Transformers fans and watched every other giant robot franchise (including anime) we could get our hands on. We were aware of Gundam, but we’d never actually seen any of the shows. This was before Gundam Wing first aired on Cartoon Network’s Toonami.

(Image courtesy of Gundam Wiki)
There, on the shelves, were a few older Gundam model kits. I saw the old RX-93 ν Gundam (hereby referred to simply as Nu Gundam) kit and bought it immediately. My friend bought an old Zaku Marine Type kit. We were both aware of “action figure model kits,” since he’d previously bought several Mega Man kits from this exact store. I was excited.
So excited, in fact, that I started putting the Nu Gundam together right when we got back to the hotel. I think I only got an arm or something done that night, but I was entranced. My friend was less entranced with his Zaku Marine Type kit since it required glue, and my other friend was even less enthused since he could not abide by that type of nerdy shit. “Do you have to do this right now?” he asked.
Yes, we did.
That model kit kicked off my lifelong Gundam obsession. Soon enough, I’d be religiously watching Gundam Wing on Toonami and spending my meager data entry job paychecks on Gundam VHS tapes at Suncoast, including the old dubbed versions of the original Gundam compilation movies.
As the Gundam Wing hype exploded across the USA, Gunpla based on the mobile suits from the show started appearing on Toys R Us shelves.

(Image courtesy of Gundam Wiki)
These were re-releases of the old “No Grade” kits that appeared in Japan from 1995-96, but we didn’t know any better. They’re primitive compared to what Bandai produces today, but they were similar to my Nu Gundam kit, so that’s what I thought all Gunpla was like.
In high school, I spent many evenings with my then-girlfriend watching TV and snapping together model kits in my family’s basement. The kits were lacking in painted detail and required many stickers in order to look even halfway decent. She actually enjoyed doing paint work and putting on the stickers for me, and I enjoyed building the models themselves. We were a good team. I could have been getting in a lot more trouble back then. You know, maybe nerdy hobbies are an effective form of birth control.
Back then, there wasn’t much documentation on the “right way” to build a Gundam model kit. I simply tore the parts off of the runners with my hands. I did not sand anything. I did not get rid of the extra nubs the plastic sprues left behind. I certainly did not panel line anything or use a matte spray. I just had fun with it.

Above, you’ll see a bad photo of a few of my childhood model kits. They were all stored poorly (my fault) and pretty much completely destroyed by the time my mom found them in her house. They were thrown away without much afterthought.
After I graduated from high school and moved to Boise, Gundam MSIA figures became my main Gundam-related toy obsession. I still have a ton of them, along with other figures that scale reasonably well with them (MS in Pocket, G-Frame, Gundam Infinity, etc.) but I never gave Gunpla too much thought again until recently.
I wanted to try again, though. Because Build Divers burrowed itself deep into my brain, because I wanted to see what modern Gundam Kits were like, and because I wanted to challenge myself. I’ve been talking to my therapist a lot about how I’m constantly frustrated with myself and with my disability, and how I should learn to try things anyway and give myself some grace when they don’t work out. My therapist is a smart woman, so I thought getting back in touch with Gunpla might be a way to follow her suggestion.
2013 HGBF Wing Gundam Fenice – The Build
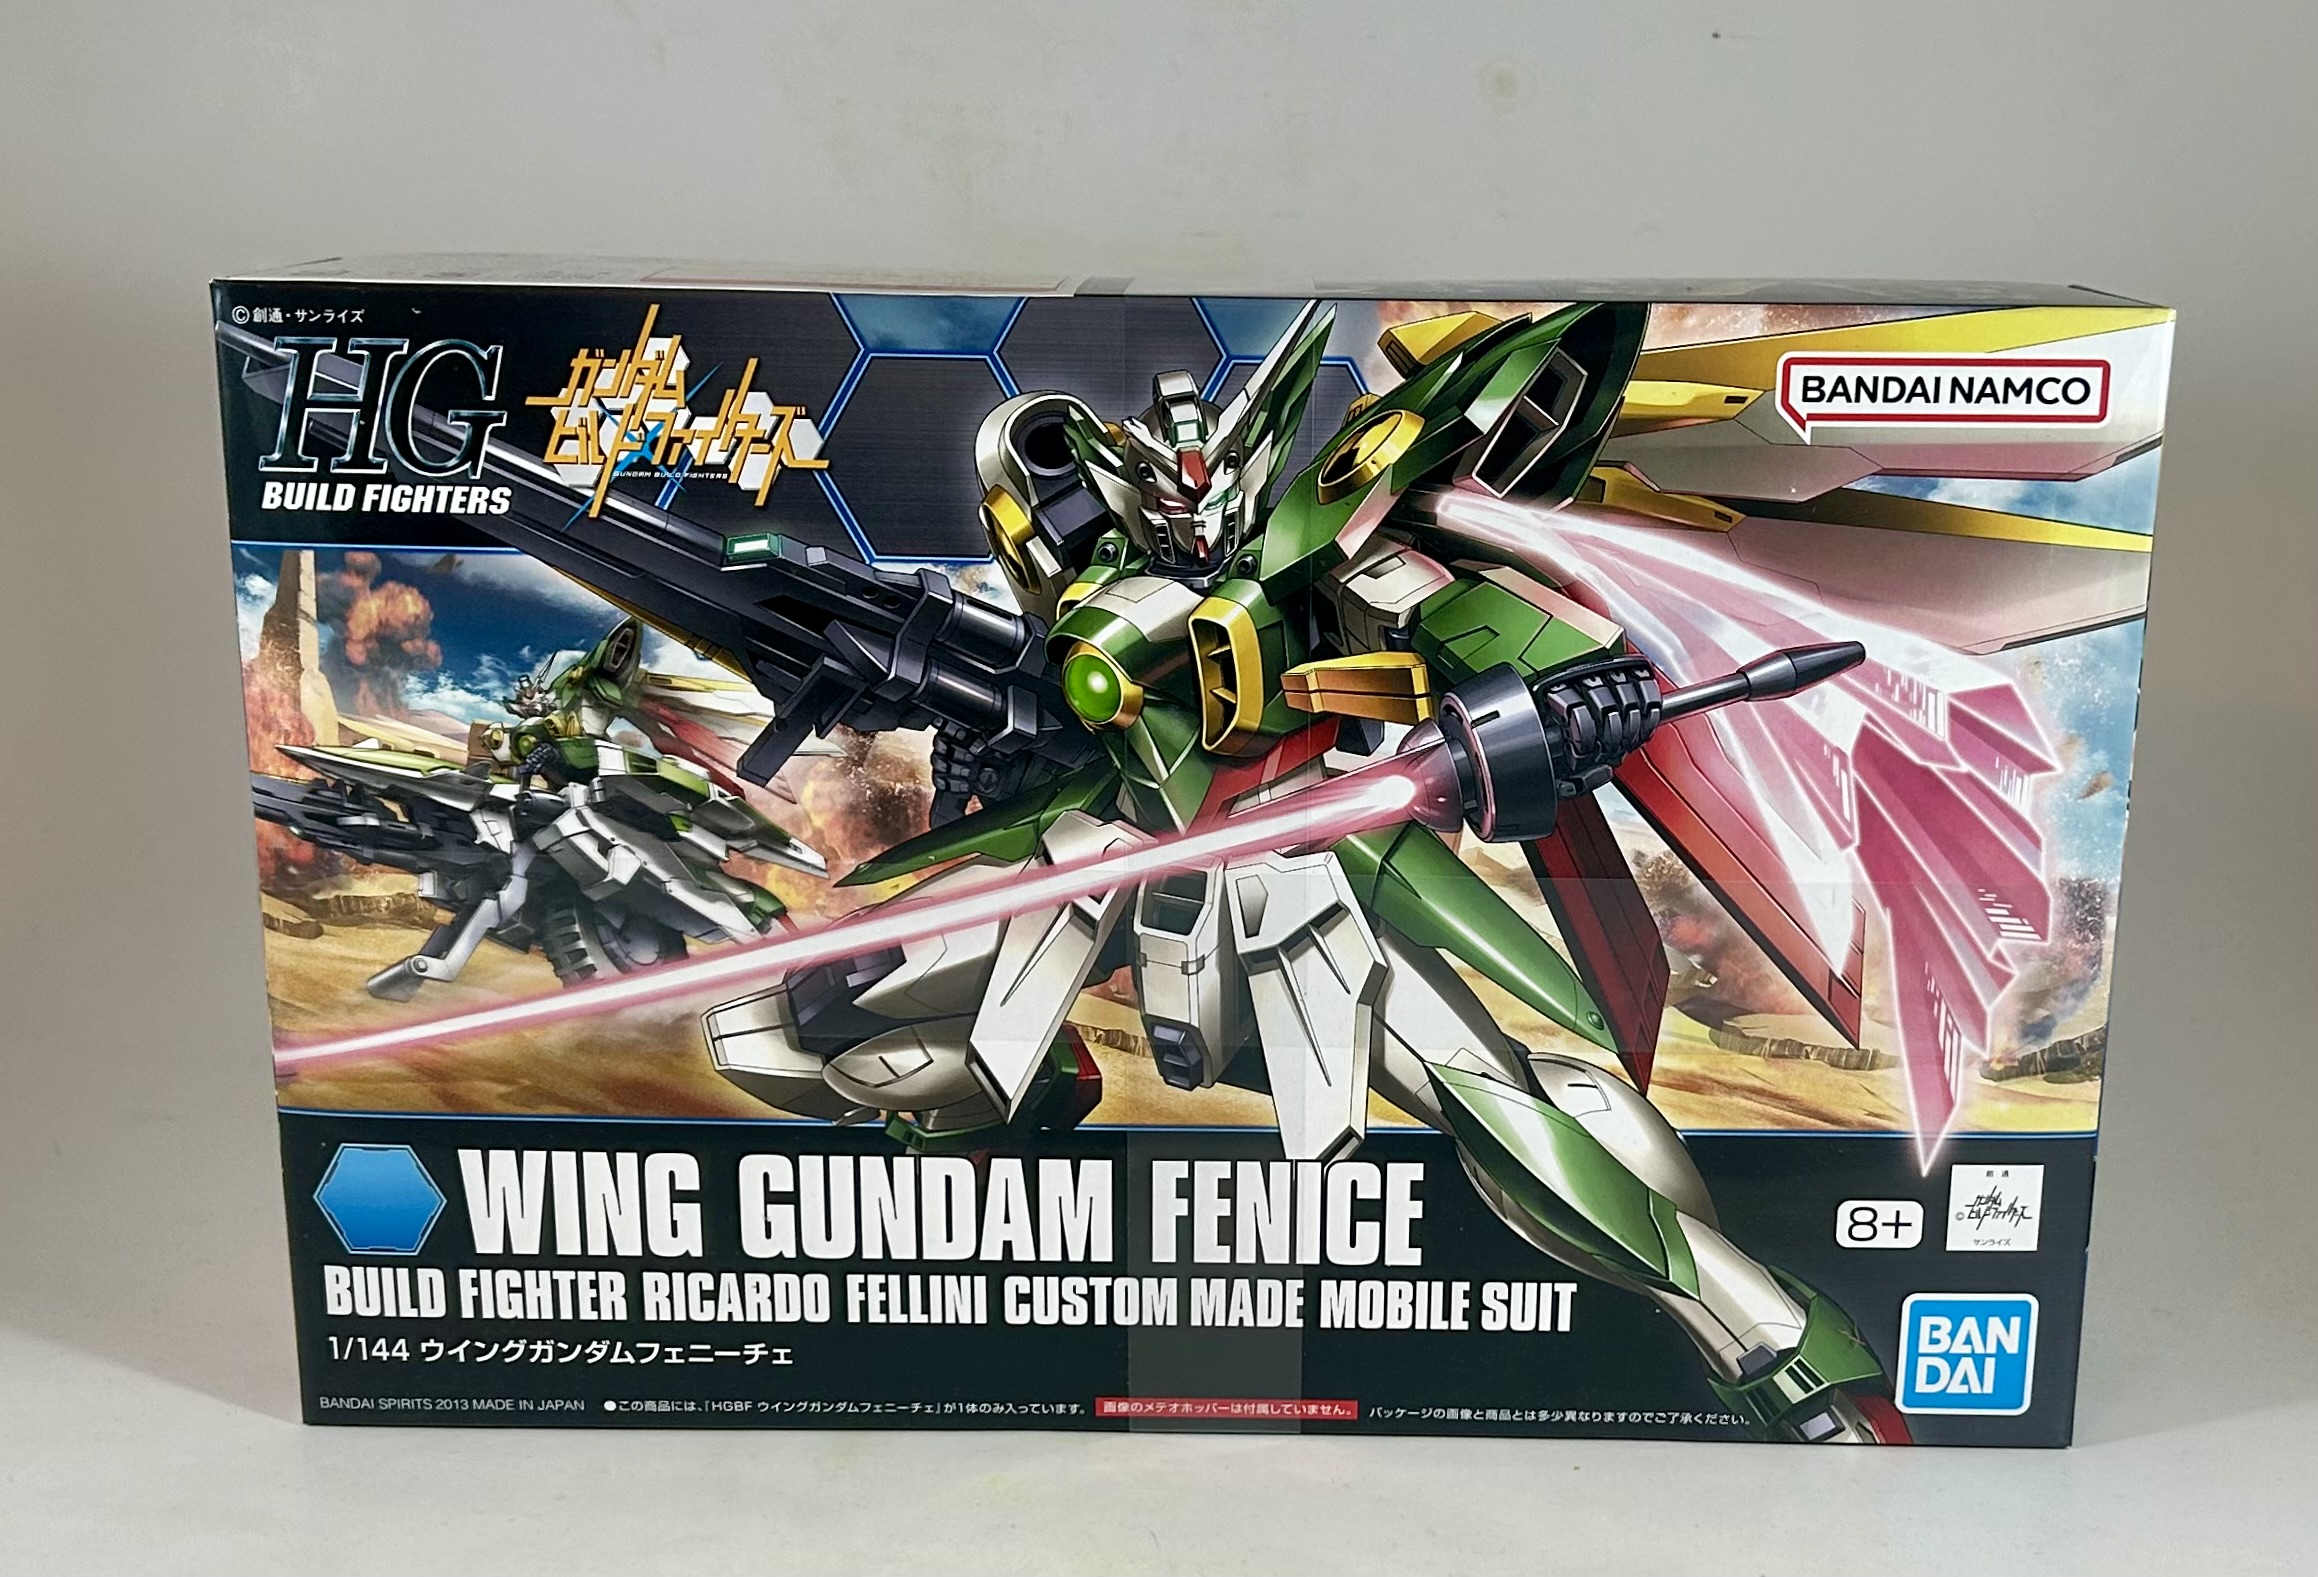
I had to start somewhere, and picking out a model was the first step. I first watched the original Gundam Build Fighters a few years ago and one of the side character’s mobile suits/Gunpla really stood out to me– the Wing Gundam Fenice, built and piloted by Ricardo Fellini, the Italian Dandy.
I mostly built Gundam Wing kits when I was a teenager, so this kit immediately appealed to my nostalgia. It’s also cool to see a more dynamic, asymmetrical take on an iconic mobile suit. The green, white, yellow, and red color scheme helped, too. This is why I buy so many Transformers repaints. I love seeing cool robots in new colors.
The box was a bit bigger than what I was used to as a kid, but I did often see larger kits at Barnes and Noble or comic book stores, so this wasn’t too surprising to me.

I was a bit intimidated once I opened the box, though. I’m familiar with the labeled plastic runners, but there were way more of them than I expected. The instruction manual was recognizable to me, but it was also much larger than any Gundam model manual I’d ever seen before. Which is funny because this is a very basic model kit. It’s nothing fancy or complex.

But, to me, even something the average Gunpla hobbyist might whip together in a matter of hours seems positively overwhelming.

Still, the steps were clearly labeled and I mostly knew what I was doing from past experience.
This time, though, I wanted to do things the “right” way. I didn’t want to just sloppily wing it like I did when I was a kid. This meant reading tutorials, watching videos, and finding out what the bare minimum was for a presentable Gundam kit. And I wanted to at least exceed the bare minimum, if I could.
So I decided the kit had to be panel lined, the parts would be clipped out the proper way, the plastic nubs from the runners would be sanded down, stickers would be applied, and the whole thing would be sprayed with a matte coat so it looked less like a “toy” (it is still a toy).

First up, I decided to panel line the kit. I did this while the parts were still on the runners because I figured that might work best with my shaky hands. There are many ways to panel line a Gundam model, so I kind of just chose one that I thought might be easiest for me.
I used some fine-tipped Gundam markers and tried to use cotton swabs to thin out the lines and remove any excess marks. The trouble was that my hands were so shaky that I got extra marker lines absolutely everywhere. When I tried to erase all of the slop, I’d end up removing the panel lines themselves, too.
This led to me using rubbing alcohol and a paper towel to remove the excess marker instead of just the plain Q-Tip.

I tried to keep the panel lines subtle and as clean as I could. They did not end up super clean, and some were more subtle than I wanted them to be. I also missed some spots that I should have panel lined.
Still, this was my first attempt at panel lining and my first Gundam kit in more than two decades. This was supposed to be an exercise in giving myself some grace and pushing through the challenge, so I decided I did an okay job for my first go around. I wish it was better, but I still did my best, learned from my mistakes, and ended up with something presentable.
Not too bad, all told.

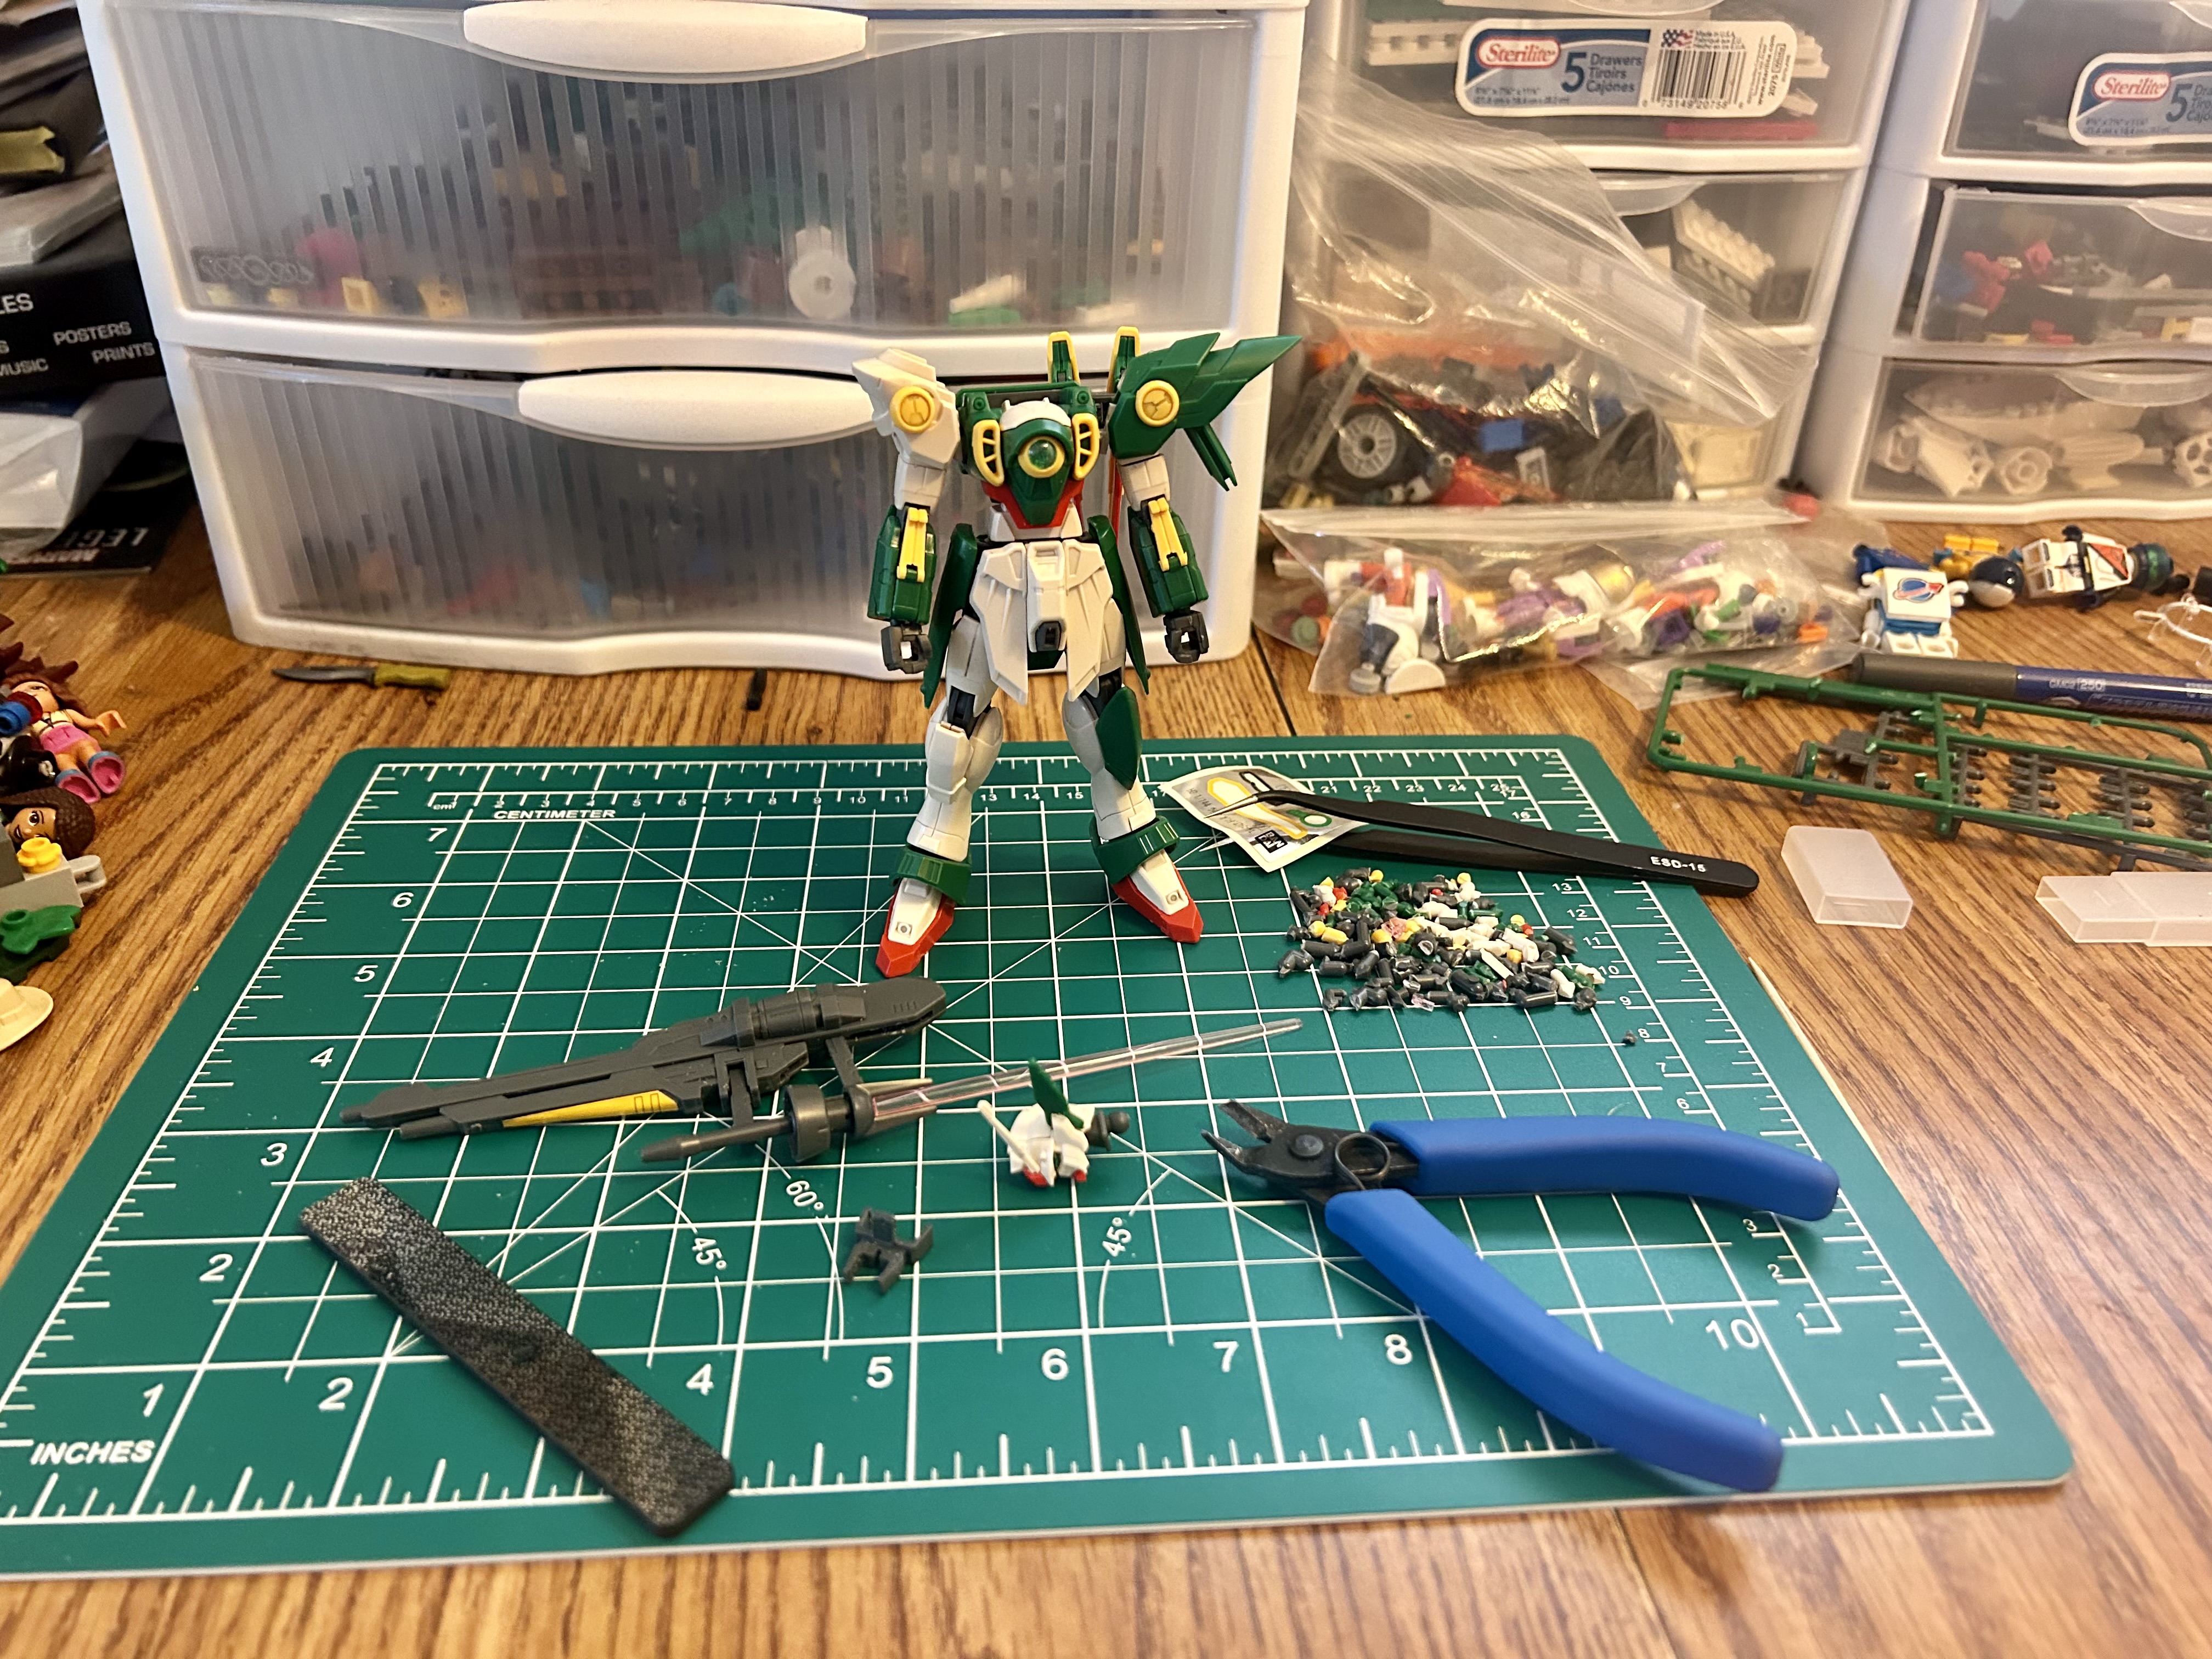
Assembling the model came next. I just followed the instructions step by step, going in the exact order they showed me. I did get confused a few times, but I kind of got into the groove of it after a few steps.
For each part, I did the “double snip” method (you cut the part off the runner, leaving some of the sprue nub behind, and then make a closer, more precise cut once the part is free from the sprue) and then sanded down any remaining plastic with a glass file.
Many people use a hobby knife to completely remove nubs, but I’d be missing several fingers if I tried that method. If I can’t be trusted to draw a straight, guided line with a Gundam marker, then I certainly cannot be trusted to make precision cuts with a sharp blade near my fingers. That’s just the sad reality of it and I do not need even more medical debt.

At first, I thought I was doing a pretty good job of cleaning up each and every part I snapped together. But then, looking at my photos, I realized there were still some noticeable plastic nubs on some of the pieces. I went back and filed them down again.
The first sticker I applied was the green “jewel” on the Fenice’s chest. It’s a simple foil decal that fits over a yellow piece and is covered by a clear dome. I followed what all of the tutorials said and used a pair of tweezers. I got that particular sticker on with ease, so I was feeling pretty good about myself. False confidence is a real son of a bitch, as I’d soon learn.

As I went along, I started encountering smaller and smaller parts. The Gundam’s head, in particular, was very difficult for me to assemble. The pieces were tiny and my hands were shaky. It probably took me about a half hour to put those few pieces together and I felt very accomplished when I finished. I knew luck had something to do with it, though, which we’ll get back to in a moment.
Back in my high school days, I always asked my then-girlfriend to place the eye stickers on every Gundam kit. My hands were shaky back then, too (though I’d give anything to be the level of shaky I was back then compared to the level of shaky I am now) so it was quite difficult for me. With the Wing Gundam Fenice, I didn’t have anyone else to turn to. This was a solo project. I had to place the eye stickers myself.
But I got the chest sticker on without a problem, so the eye sticker couldn’t be that difficult, right? … right?
Well, no. It was a terrible ordeal. Even bracing my hands and using tweezers, I couldn’t seem to get it on straight. As I kept trying, I accidentally tore the sticker in half. I was absolutely gutted, and it also made me realize just how much sheer luck went into my adequately placing the chest sticker.
In the end, I used a little bit of white glue to stick each half of the torn sticker onto the model. Thankfully, because of how it’s assembled, you can’t really see the split in the sticker and it looks just fine. I’m chalking this one up to luck, too.

As I kept working, I became impressed with the construction itself. The color separation between parts was miles ahead of anything I’d built before. The joints were more intricate and building them was interesting. With those old No Grade Gundam Wing kits, I knew how everything would go together. They were all very similar.
While the Fenice did use polycaps for the joints and had some familiar steps, the joints were far more complex and surprised me more than a few times. I know this kit is basically Babytown Frolics compared to your various Master Grades and Real Grades, but it still impressed me on multiple occasions.

I was often impressed, but I was also often frustrated. I’m not sure how long it takes the average Gunpla hobbyist to build a standard HG kit but I was probably 8 hours in by the time I had the kit’s head, torso, and limbs assembled.
I took many breaks just because of how much time went by. But I also had to take many breaks just because my hands weren’t working at all. I’d often find myself getting into a groove, and then being roughly ejected out of the groove once I couldn’t snap two simple parts together. When that happened, it was time for a break.
Still, I was making noticeable progress. I finally got the full body and wing backpack assembled. But then when I pushed the backpack on, the Fenice’s head somehow went flying off and flew to pieces.

And then I couldn’t get it back together again. The little green wings just would not stay in. Remember what I said about dealing with very small pieces and being grateful I got the head assembled? Well, it was no longer assembled and I could not get the whole thing to stay together.
So I resorted to using a toothpick and some super glue. I had to work very carefully and slowly, and it probably took me about 45 minutes to get a few small pieces back on the head of a toy model meant for 8 year old children.
I was not feeling good about myself.
Soon after getting the model’s head back together, I was chatting with my friend Luke (aka Video Dracula) and he told me that having to glue a little piece on a Gundam model is not uncommon. That exchange gave me some renewed confidence and energy.
Soon enough, I was putting the head back onto the model and preparing to build the Fenice’s weapons, which were all I had left.
The Fenice’s beam saber is very cool and I was quite excited for it. But the parts fit wasn’t great right out of the box. The saber’s handle and hand guard came apart very easily. Sometimes gravity would just separate the weapon’s component pieces. And if gravity wasn’t going to do it, then placing the weapon in the Gundam’s hand was certainly going to do it.
It was time for another fix.

I’m no stranger to fixing or modifying toys. Despite my shaky hands and poor motor skills, I’ve been dealing with poor quality control on mainstream action figures for most of my 40 years of life. So I knew how to fix this one.
With modern Transformers, you often have to fix loose joints or loose weapon grips by applying something to thicken the plastic. You can do this with clear nail polish, super glue, acrylic floor polish, or any number of other things. In this case, I chose some acrylic floor polish, which I applied to the beam saber handle, hand guard, and blade with a cotton swab. I ended up doing three coats.
The fit of the weapon still isn’t perfect, but it at least holds together for poses and photographs now.

Once the weapons were assembled (including some tricky stickers on the buster rifle), I was done putting the kit together.
But I wasn’t done with the project itself.
I still had to spray the whole kit with a matte finish, which was maybe the most intimidating part of the entire process to me. I’ve read horror stories about applying too much matte spray, about the spray not curing, and about how bad it looks when you miss a spot. I’m notoriously bad at using spray paint and air brushes, too, so I was extra bugged out.

I tried to make the matte spray process easier on myself. I read the guides and brought the recommended spray, as well as some sticks with clips to attach the model’s parts to for the spraying and drying process. I already forget what you call the clips with sticks, but that’s what they are.
Much to my surprise, applying the matte spray was the easiest part of the entire project. I disassembled the kit into its component parts (head, torso, arms, legs, backpack, weapons), stuck each part to a clip, and got going. I took each piece outside, sprayed it evenly while rotating the part via its attached stick, and then put it back inside to dry.
I was very happy when I found I’d applied the spray evenly and it looked just like it should.

After what was likely 12+ hours of work, I had a basic, fully assembled Gundam HG kit on my work table.
I did the bare minimum. Exceeded it, even. I did every single thing I wanted to do with the kit and it did not look like a total trainwreck when I was finished.
So I decided to take some photos and look at the finished Gundam model as I would any other toy I might review.
2013 HGBF Wing Gundam Fenice – The Finished Product
The HGBF Wing Gundam Fenice is your standard 1/144 scale Gundam model kit. There’s nothing fancy or deluxe about it. It’s a kit meant for both diehard Build Fighters fans and casual hobbyists. It’s great for both kids and adults. It’s a very basic model and there are no surprises here, but it also looks good right out of the box.
But it did teach me what to expect from a modern Gundam model, even though this kit is 11 years old at this point.

Even though this is an older kit, the build process showed me how far Gunpla has come since I was in high school. The color separation between parts, the fine details, and the articulation are all miles ahead of anything I ever built before. The assembly process kept me guessing and also impressed me many times along the way.
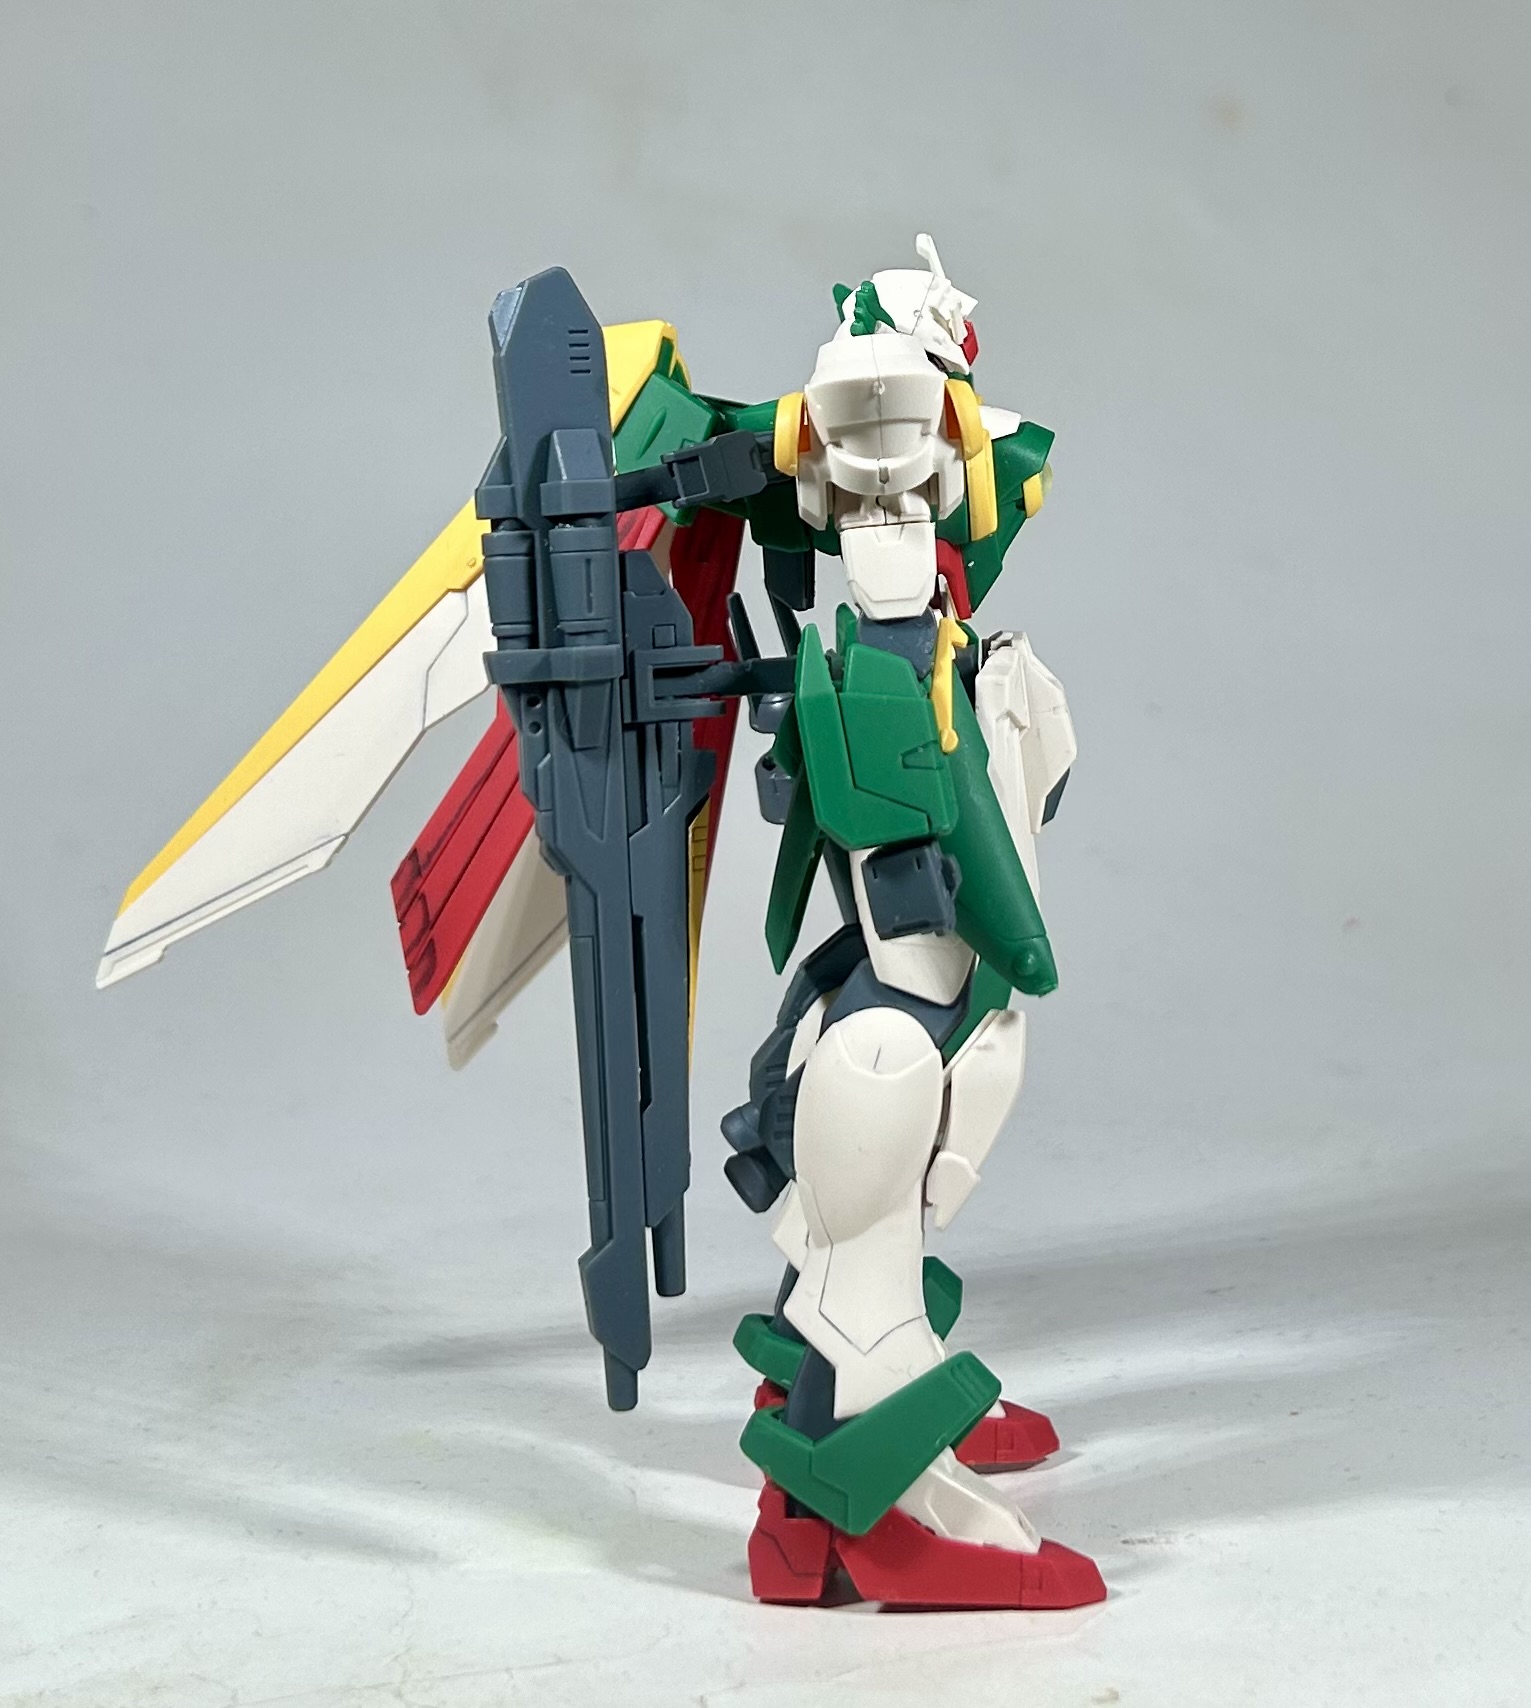
The kit looks excellent, even with the minimal amount of extra aesthetic work I was able to put in. It’s a fantastic design with a cool color scheme and fun weapons. The proportions are exactly what you want them to be and the articulation works as intended.
It’s much more poseable than any Gundam action figure I’ve ever owned. In that regard, I see why people love Gunpla so much.

I also really like that the weapons all have a dedicated storage spot on the model. The buster rifle can attach to the figure’s backpack and the beam saber stores on the figure’s left arm. That saber storage is extra cool as well because, in the TV show, the stored beam saber functions as an extra beam cannon when it’s attached to the mobile suit’s arm.

The Fenice’s wings are also attached by polycap joints and are able to strike a variety of poses. They look particularly cool when they’re spread out. The asymmetrical design makes this Gundam inherently visually interesting to me, as well.
The HGBF Wing Gundam Fenice includes three accessories (technically four), all of which suit it very well. It’s equipped with its rapier-like beam saber (with removable blade), a beam mantle (a cape, essentially) that attaches to its left shoulder, and a buster rifle that can separate into two smaller guns. There’s a lot you can do with it.

The buster rifle, in both of its forms, simply slides into the Fenice’s hands. The beam saber needs to be taken apart at the handle, slid into the hand, and then reconnected. The beam mantle simply slides into a port on the Gundam’s left shoulder.
I really like the clear pink color Bandai chose for the beam saber blade and the beam mantle. In fact, I think the entire package is just about perfect and I couldn’t ask for anything more.

But, as it turns out, Gunpla probably just isn’t for me. Even though I think the Fenice is a great looking kit with fun accessories, posing and handling it is still a nightmare for me. It’s a model and not an action figure, after all, so it feels fragile. That’s just how model kits are. Even when I was attempting to get the kit into a simple pose, a part would always come off and fall to the floor. I would then get flustered, my hands would get even shakier, and it would take me way too long to put the part back in place.

Building the HG Fenice really reinforced that I’m an action figure person more than I am a model kit person. With a Gundam action figure, I can usually just play with and pose the thing however I want to. It will be sturdy and it won’t fall apart (unless it’s part of the 00 MSIA line, that is) unless I do something very stupid. For me, even basic handling of this model kit is both frustrating and nerve-racking.
In the photo above, you’ll see the Fenice standing next to the Mobile Suit in Action (MSIA) Wing Gundam 2.0, released by Bandai of America in 2003. It should give you a good idea of the size difference between the MSIA line and a 1/144 scale Gundam kit, but it also reinforces what I’ve been saying all along.
A modern Gunpla has much better articulation and detail than most any MSIA figure. It can get into more dynamic poses and it comes with all of its weapons. It’s also something that you build yourself, and each Gundam kit is something you make your own. Every single Gunpla you build is unique to you. An MSIA is just a mass-produced action figure.
But, at the end of the day, I’ll take the mass-produced action figure. I’m much more interested in straight forward toys than I am in model kits.

I’m proud of myself for seeing this project through and for ;putting in the extra work to panel line, matte spray, and do a clean build. It was very difficult for me and it wasn’t always fun. In fact, it was more frustrating than fun overall. And the end result is something that I’m afraid to touch too much. I’m not happy with the final pose I got it in before I put it on the shelf, but I was too anxious to repose it, knock a bunch of pieces off, and make everything worse. With an action figure, I don’t have those concerns.
That’s not to say that building the Wing Gundam Fenice was a waste of time– far from it! This project was an exercise in being patient with myself, believing in myself, and giving myself more grace than I ever would normally. In that regard, it was a rousing success. I saw it through no matter how hard it got and I was left with a cool looking model kit that I’m actually pretty proud of. I challenged myself and followed through. To me, that’s a big deal.
It’s not perfect, but it is unique to me. This Wing Gundam Fenice was built with my own shaky hands and not a single other Wing Gundam Fenice is exactly like it.
Signing Off

Thanks for joining me for this long post. I know most of you are here for GI Joe and a small handful of you are here for 90s toys in general. This post is about neither one of those things. I hope you enjoyed it, though, as it won’t be my last Gundam post. It will likely be my last Gunpla post, however.
I did buy one other Gundam kit– the Solari Zaku II from Requiem for Vengeance, which I’ll probably build at some point. I also have a couple of little 30 Minute Mission hangar and vehicle sets, which I think will be nice for photos. I still really enjoy building things, but I think I’m just more of a Lego guy than a Gunpla guy. And that’s okay. I gave it my best shot.
I’ll be returning to the world of GI Joe with my next post. I hope to see you there.
In the meantime, do you have any experience with Gunpla? Did you build model planes or cars when you were a kid? Do you have a model train setup? Let me know in the comments!

Don’t be too hard on yourself. Those eye stickers are terrible no matter your skill level or dexterity. It’s the only thing Bandai have never improved in their kits.
LikeLiked by 1 person
Thanks for that. It really reminded me of that little scene in Build Fighters where you just see someone’s hand gripping a pair of tweezers, shaking badly while they’re trying to line up the eye sticker haha.
Though apparently some of the newer kits have nice, color separated eyes that don’t require any stickers. Must be nice!
LikeLiked by 1 person
Like Dustin said, as of pretty recently, 1/144 kits do have color separated eyes! I believe it started with the Entry Grade line. Many of the Witch From Mercury kits also had them. They’ve also pretty much phased out polycaps. It’s amazing how far the engineering has come.
LikeLiked by 1 person
MY DUDE. You did fuckin’ amazing, man! I don’t sand, paint, glue – NUTHIN’. I just have those sprue marks on it, I don’t care. I barely have the patience for it, even though I’ve got so many of them in the past. I came to the same conclusion, though: I like the toys more. Still, I find myself getting a model here or there, for old times sake. I just don’t do anything beyond building them!
LikeLiked by 1 person
Thanks so much, Eric! That 30MM knight or whatever it was you posted recently looked so cool, especially with the add-on armor kit. But that’s how they get you, I guess! I might try one of the actual robot or knight kits at some point, depending on how my hangars and truck go.
LikeLike
I haven’t put stickers on since Gundam Seed was a thing. Even though my aging eyesight struggles, I paint the eyes, and do an enamel wash for panel lining. I just never have the time to do it!
LikeLiked by 1 person
Aye, you did good all things considered. Better than my first gunpla kit when I came back into building.
That NG Deathscythe was my first gunpla back in the year 2000. I was able to find one recently, but its not the exact same, is the one without the Duo figure.
LikeLiked by 1 person
Thanks for stopping by and thanks for the kind words.
My memory isn’t super clear, but I don’t recall any of my old Wing NG kits coming with pilots. They were just the ones that were widely available at TRU back in the day.
LikeLike
I too have a model kit I have left unbuilt mostly because I am a klutz AND a jinx and generally the moment I think things are going well is the moment I manage to fling a vital tiny joint piece across the room onto the floor to be lost forever (this has happened SO MANY TIMES despite many precautions). Thanks for doing this project – honestly makes me think about how I really wanted to try that model kit. Also I just like it when people talk about their toys – no strict theme necessary!
LikeLiked by 1 person
Thanks for the comment, podcast listener! I did have a few pieces fly away during the build due to my clumsiness, but left those parts out of the post because it was already a long one. 4000+ words. Yikes! When I was first assembling the head, the V-Fin ran away from me. Luckily I found it, but I didn’t think I would. I also lost the beam saber blade when it flew behind my little Lego cabinets. That one was wild, haha. But against all odds I was able to find it. I would have been absolutely gutted if I’d lost the pieces forever. I wonder if Bandai does replacement parts or runners?
LikeLike
Yeah it aint fun having something wrong with you is it.
The Charcot Marie Tooth disease that affects me gives me similar problems to what you described – as well as a whole bunch of others – and attempting a kit like this would be completely beyond me
LikeLiked by 1 person
Thanks for stopping by and leaving a comment, Philip. I’m sorry you have to struggle with that. It really sucks when our bodies put up roadblocks that get in the way of… well, basically everything. If I get frustrated all the time, I’m sure you do, too.
LikeLike
Hey I’m glad my little encouragement helped you somewhat! Something frustrating always happens during a gunpla build no matter how able you are, it’s just part of the process. The finished kit looks great.
LikeLiked by 1 person
Thanks for stopping by and for the kind words, my friend. And another big thanks for helping me through the process. It was nice to have an on-call Gunpla Mentor.
LikeLike